Butterfly Painting Lesson Plan
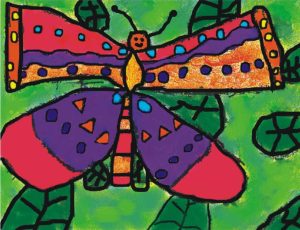
A crayon drawing filled with watercolor shapes

Process
Day One:
- Talk about BUTTERFLIES and LEAVES.
- Using examples show different kinds of butterflies.
- Emphasize the symmetry of the wings and the different shapes within both the butterflies and the leaves.
- Show shape sampler.
- Have students draw their own ideas of shapes for the butterfly and leaves.
- Discuss the art materials.
- Show how crayon resists watercolor paints.
- Start by making a pencil sketch of the butterfly and leaves.
- The majority of the space should be filled with the butterfly.
- Students may practice on scrap paper.
- Go over the pencil lines with a black crayon.
- Press down firmly.
- Make sure to erase or cover all pencil lines.
- Add shapes on the wings and body.
- Refer to the pattern sampler.
- Add the leaves.
- Use examples and books as reference.
Day Two:
- Students can begin using watercolors when drawings are done.
- Start with the background, use ONLY green.
- Yellow and blue may be mixed with the green to achieve some variation.
- Use bright colors for the butterfly.
- Avoid using green
- Fill in the shapes with different colors
- Each side should be symmetrical.
- Add finishing touches such as butterfly detail (facial features & antennae)
- Make sure that pictures are complete.
- Students name should be printed on the front, 1″ away from the paper edge.
- Record the student name, grade/teacher and school, in pencil, on the back of the artwork.
Special thanks to Nancy Murphy, Art Educator @ Alpharetta, GA for this lesson plan!
Age Group
Grades K-1
Difficulty
Moderate
3/5
Time
2-3 Class Sessions
Materials
- 8 1/2″ x 11″ white art paper
- watercolor paints & brushes
- black crayons
- shape sampler
- books about butterflies
- examples of butterflies & leaves
- example of the project
